| Terrapin FTP Browser |
Terrapin FTP is the ideal FTP client to use to upload your web pages. It offers an easy to use drag-and-drop interface and has many advanced features for efficient site maintenance. To try out Terrapin FTP download a 30 day evaluation copy from here.
There is a special 25% discount for Freeserve subscribers so it's only £14.95 if you decide to register the software. To take advantage of this discount register using the special Freeserve secure registration page. Click here.
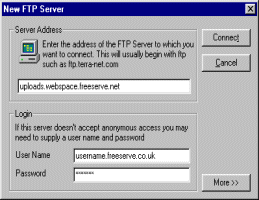
To illustrate how easy it is to upload your web pages you will find step by step instructions below. If you want to find out more about Terrapin FTP then visit the Terrapin web site at www.tpin.com.
If you are new to FTP then you will find a complete section on the Terrapin web site devoted to explaining what FTP is, how to use it and FTP's advantages. There is also a section on Web Maintenance which highlights some of the common mistakes encountered when building web sites. This can be found at http://www.tpin.com/eu/newuser/ftpnew.html.


This will give you a permanent record of the contents of your site so you can always check to see what files are up there.
To maintain your site in the future all you will need to do is open the Site Map by selecting
Server... then Open... or by using the
![]() Tool Bar short cut and then selecting the server you want to connect to.
Tool Bar short cut and then selecting the server you want to connect to.
How to build your first website
If you've never built a web site before then this section will explain how to create a simple website with text and images using
FrontPage Express. If you have not installed FrontPage Express you can find it on your Freeserve CD. (Insert the CD and click
Install. You then need to install IE4 and select the "Freeserve Full Installation" option).
Our advice would be to keep it simple to start with. First, get something live on the web so that you understand the principles and feel comfortable with what you are doing. Then you can spend the time later to get your web site looking the way you really want it.
If you follow the simple steps below and then follow the upload instructions you should have your first website live in minutes, and you will understand the concepts of website building.
First create a directory on your computer in which you can build your site. This is where you will save your HTML and image files. You can create the directory on your computer using Windows Explorer. Open the directory where you want the new directory to be and then click File... New Folder... from the menu. You can give the directory any name you wish but the rest of these instructions will assume that you have named it www.
 Now copy any image
files that you want to put on your site into the www directory. If you do not have any images then for test purposes use
the image on the right. To save it right click the image and click Save Picture As... and
save it to your www directory. The instructions below will assume you did not change the
name and will refer to this image as test.gif.
NB You will notice that all the example file names used in these instructions are in lower case only. This is not by accident - the computer hosting your website is case sensitive. It is strongly recommended that you only use lower case to name the files that will make up your website.
For test purposes you may just wish to type "Welcome to my (your name) homepage" at the top. Then put a few carriage returns in and type "This page is currently under construction".
You can change the font, font size and colour by first selecting the text you wish to edit and then clicking Format... Font... from the menu.
It may be nice to add a background at this stage. You can add a background image later on but for now just pick a suitable background colour by clicking Format... Background... from the menu and selecting your chosen colour.
NB If you want this webpage to be your homepage (i.e. the first page of your website) you must save the file with the name "index.htm" (or "index.html"). Webservers are automatically configured to display the index.htm file whenever someone visits your site.
You can position the image by dragging it or by using the centre, right and left justify icons on the tool bar.
Then save the file again by clicking File... Save... (you do not need to use the Save As... option again). You have now built your web site on your computer and just need to upload it to the internet.
Before you upload your files, test your site on your computer. Open up your www directory in Windows Explorer and you will see the two files that make up your site (index.htm and test.gif). Now double click the index.htm file and this will display your web site in your web browser.
It may not be perfect but now you know how to build it and that it consists of separate files. The final step is to upload both files to your webspace and then it will be published on the Internet. See the upload instructions above.