1. Click on the  button on your desktop, go to Settings and click on Control Panel.
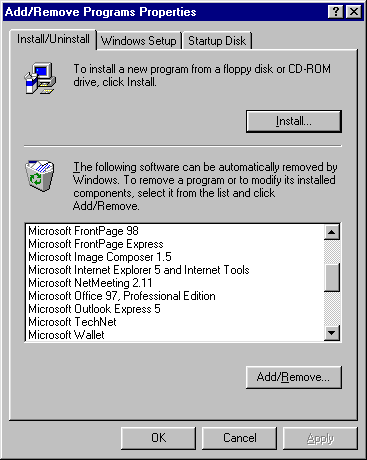
2. Double click on the 'Add/Remove Programs' icon. This will give you a window similar to the one below.
button on your desktop, go to Settings and click on Control Panel.
2. Double click on the 'Add/Remove Programs' icon. This will give you a window similar to the one below.
3. Click on the tab at the top that says 'Windows Setup'. This will respond in one of two ways.
- If you have Windows 95 the 'Windows Setup' screen
will appear immediately (if so jump to step 4).
- If you have Windows 98 you will see a message saying 'Please wait while windows searches for installed components' after this message you will receive the 'Windows Setup' screen.
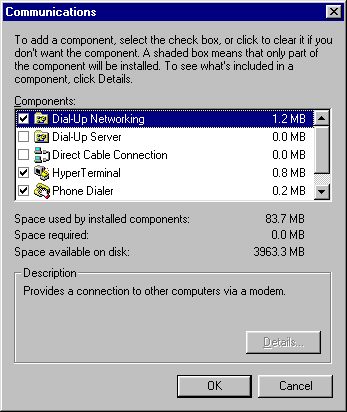
4.Click on Communications:

and then click on Details. You will see a screen similar to the one below.
5.
A list of all the communication software that can be installed as standard on your machine is shown. We are only interested in 'Dial-Up Networking'. This is the software that enables your computer to talk to the computers at Freeserve. If there is a tick in the box next to Dial-Up Networking then you have the required software. If this is the case, click on Cancel then click Cancel again and close the Control Panel to get back to the desktop. You can now jump to B. Connection Settings. Otherwise proceed to 6. below.
6. If there is no tick next to Dial-Up Networking the software is not installed. You will be unable to connect to the internet until this is installed. To install Dial-Up Networking you will need your WindowsTM CD-ROM. If you have your WindowsTM CD-ROM go to 7. Otherwise Click Cancel, then Cancel again, then close the Control Panel. You will not be able to complete the installation until you have your WindowsTM CD-ROM to hand.
7. Click on the blank box next to Dial-Up Networking, this will insert a tick into the box. Now Click on Apply at the bottom of the screen. Windows will now start to search for the files needed to install Dial-Up Networking. At this stage you should be asked for your WindowsTM CD-ROM. If you are not asked for the CD-ROM but the installation proceeds (you'll see the progress bar increasing) don't worry - this means that your installation files are located on you hard drive. (This will often happen on Packard Bell ��TM Personal Computers).
Your computer will now restart with the necessary communication software installed.
 B. Do you have the correct connection settings?
Freeserve has it's own unique settings to enable you to connect to the internet. If any of these settings are incorrect you will experience problems connecting to Freeserve. To check these settings follow the instructions below.

1. From the Windows Desktop double click on the 'My Computer' icon.
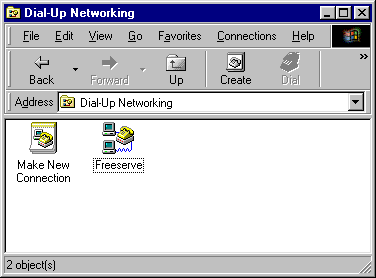
Then Double click on the Icon called 'Dial-Up Networking'.
2.
You will see a screen similar to the one below - the box should contain at least one icon labelled either 'Freeserve' or 'Freeserve for ...'. If there is only a single icon labelled 'Make new connection', go to step X. to create a Freeserve connection.
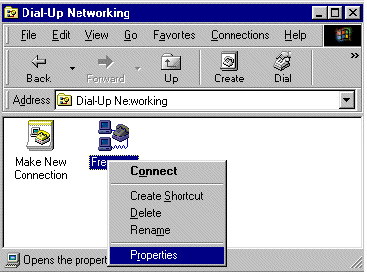
3. Checking the existing connection.
Right Mouse Click on the Icon called either 'Freeserve' or 'Freeserve for ...' and then click on Properties.
4. The Properties box will look similar to the one below. The next step is to check the Telephone Number and Modem Configuration options.
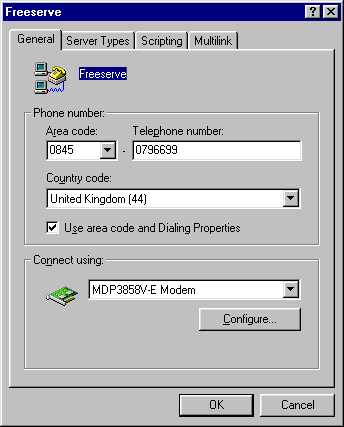
In the Area Code box you should have 0845 and in the Telephone Number box you should have 0796699
If these either of these are wrong they can be changed by double clicking in the required area and pressing the delete key on your keyboard. This will clear the field and allow you to type the correct number.
Please Note
If you withhold your caller line identity (CLID) then you will need to change the telephone number you dial in order to make full use of the Freeserve service.
For British Telecom and Cable & Wireless customers the number needed to be dialled is 147008450796699. If you are a none British Telecom or Cable & Wireless customer please contact your Telecom provider for more information regarding releasing your Caller Line Identity.
The easiest way to change this number is to do as follows:
1. Remove the tick from 'Use area code and dialing properties'.
2. Replace the Telephone number with 1470 0845 0796699. This will give you a screen like the one below:
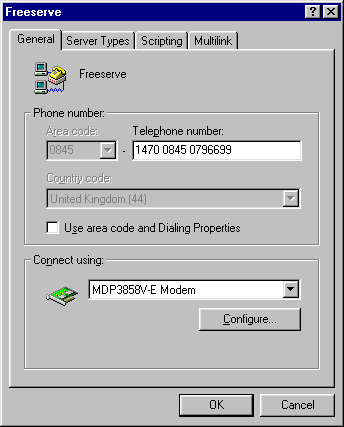
With this phone number you will be able to make full use of the Freeserve Service.
5. From the 'Properties' box, now click on 'Configure' (in the 'Connect using' section). You will see this box:
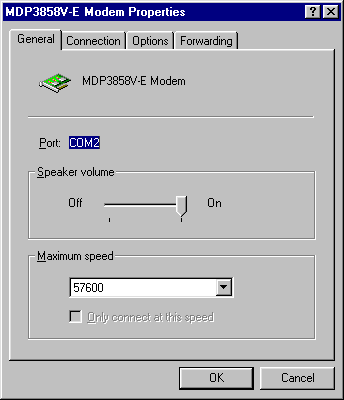
Now click on 'Connection' this should have 2 options enabled (ticked):
- Wait for Dial Tone before dialing.
- Cancel the Call if not connected within XX seconds.

Disconnect if Idle may be 'greyed out' (i.e unable to be ticked) - this is fine, instructions for setting this value are given later.
Now click on Options. There are 4 options - under normal circumstances none of these should be ticked.

If you have a Call Forwarding service and want to enable it, next click on Forwarding.
This will give you one option, Call Forwarding. This option gives you the ability to disable call forwarding or enable it when using the Internet. This option should be left un-ticked if you do not use Call Forwarding.
Once you have checked all of these settings click on OK to return to 'Freeserve connection properties'.
6. Next, we need to check the settings for your connection with Freeserve.
Click on 'Server Types' at the top of the screen and you'll see a series of options. You need to ensure the following:
Dial-Up Server.
If you are running Windows 98, the type of Dial-Up Server should be set to:
PPP: Internet, Windows NT Server, Windows 98
If you are Running Windows 95, the type of Dial-Up server should be set to:
PPP: Windows 95, Windows NT 3.5, Internet
Advanced Options.
Remove any ticks from the Advanced Options Section - none of these need to be ticked.
Allowed network Protocols.
There are three options, only TCP/IP should be ticked.
When correctly configured, this screen should like like this:

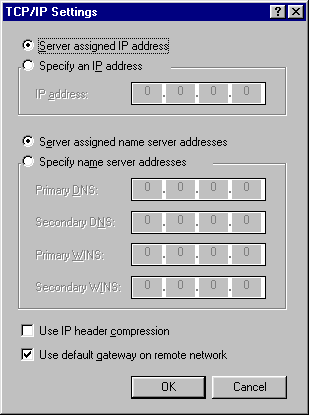
7. Now check your TCP/IP settings by clicking on the 'TCP/IP Settings' button in the Allowed Network Protocols section. TCP/IP (Transfer Control Protocol / Internet Protocol) is the 'protocol' that allows your computer to communicate with the rest of the Internet.
This screen will give you access to several options:
'Server assigned IP address' should be selected (i.e. there should be a a dot in the circle next to it).
'Server assigned name server addresses' should be selected. (Name servers or DNS (Domain Name Service) are computers that translate user-friendly internet addresses like www.freeserve.net into numbered addresses that computers understand).
'Use IP header compression' should not be selected.
Use Default gateway on remote host should be selected.
Once all of these options have been checked then the TCP/IP screen should look like the one below.
Click on OK at the bottom of the screen to return 'Server Types' section of the Freeserve connection properties.
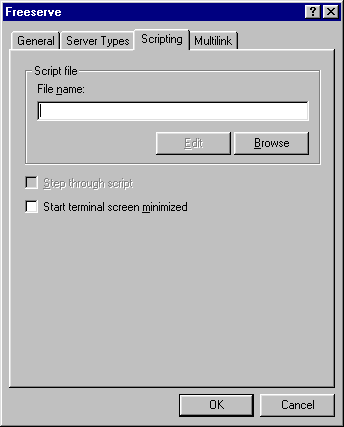
8. Now click on 'Scripting' at the top of the Freeserve your connection properties box. Your Freeserve connection does not need to any custom scripts, so these options should not be selected.
The 'Scripting' options should look like this:
9.
9.
Next, check your multilink settings. If you have two modems and two phone lines
you can use multilinking to establish two connections, giving you a twice as
fast connection to the internet.
Freeserve supports multilinking, but for the average user it will not be needed.
To check that multilinking is not enabled click on 'Multilink' at the top of the Screen
There should be a dot next to 'Do not use additional devices'.
A correct Multilink screen should look like the one below:

Click on OK to return to the Dial-Up networking screen.
10. If you've been through all the instructions above you now have a correctly configured Freeserve connection.
Go to Stage C to check that your connection is actually working.
C. Can you establish a connection?
Connect to the Internet manually to see if there are any problems with Dial-Up Networking.
1. Double click on the Icon that says either 'Freeserve' or 'Freeserve for ..' in Dial-up Networking. This will give you a screen asking for both your username and password.
Enter both of these in the boxes provided.
Your username is everything after the @ in your e-mail address. For instance, if your e-mail address was 'myname@myaddress.freeserve.co.uk' then your username would be 'myaddress.freeserve.co.uk'
Both your Username and Password are case sensitive - for instance, ThisPAss is different to ThISPASS.
This screen also gives the phone number you are going to be dialing.
It should read 0 845 0796699. Don't worry if there are spaces between the numbers.
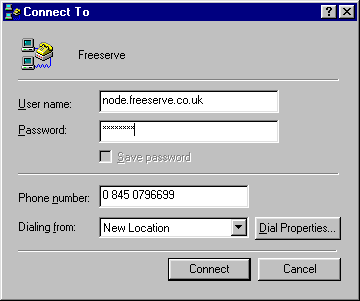
A correct connection screen should look like the one below (apart from the Username and Password which are individual to you).
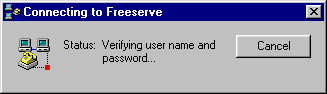
2. Now click on Connect. A box will appear telling you that the PC is 'Dialling' - after a short while this will change to say that it is 'Verifying username and password'.
If your connection is correctly configured and your username/password are correct, the connection will be successful. The connection box will disappear and in the bottom right corner of your screen (on the task bar) you will see an icon of two small green computer screens.

If there are any problems with the connection they will appear while the 'Verifying username/password screen' is displayed.
Here are a few common errors and their solutions:
Error 629 : The port was disconnected.
Solution : Possible corrupt dial-up settings check section b of this document.
Error 650 : The remote machine is not responding.
Solution : Possible corrupt dial-up settings check section b of this document.
Error 691 : Access denied because Username and/or Password was rejected.
Solution : Username and/or Password invalid check both username & password remember that both the username and password are case sensitive e.g. ThisPAss is different to ThISPASS.
3. If you have successfully connected, you can disconnect by right clicking with your mouse on the Dial-Up Networking icon (the two computer screens in the bottom right hand corner of your screen next), then clicking on 'Disconnect' in the window that appears.
You are now ready to go to Step 3. of the Freeserve Easy Guides to check your Internet Explorer settings.
