Tag Archives: guide

Guide – How To Get Epson Perfection V200 Photo Flatbed Scanner Working with Ubuntu 18.04.1

This guide will explain how to get the Epson Perfection V200 Photo flatbed scanner to work with Ubuntu 18.04.1 (64-Bit/AMD64).

Introduction (Unnecessary Story)

A little while ago I bought a flatbed scanner. It’s something I’ve always wanted since I was a young lad, because I was ultimately a strange child. I do a lot of scanning as part of my hobbies relating to archiving documents and print items. For years I have used the scanners built into various all-in-one scanner devices, but a few months ago I got so fed up constantly getting up and down to swap over documents that I said “Enough! I must buy myself a flatbed”. I made my way over to the online car boot that is Facebook Marketplace and performed a few searches. Amazingly enough there are quite a few people selling scanners. Some people wanted insane amounts for really old (like Windows 98 era) flatbeds – but eventually I found someone who had what looked like a reasonably modern model for the small sum of £5. A few days later I turn up and collect the scanner (which included a nice Belkin USB A to B cable) and that’s the end of that.

As part of my move away from Windows 10 as my primary OS to Xubuntu (see this series of posts) – I am trying to see how many of my peripherals work with the operating system. Unfortunately the Epson scanner isn’t as plug and play as my new HP All-in-One printer (which works without any fiddling) but after a few forum posts and learning a little bit on how USB scanners work in Ubuntu I finally got it working.

(If you care, the scanner works without any issue in Windows 10)

Prerequisites

You will need for this process:

  • An Epson Perfection V200 Photo flatbed scanner with USB A to B cable
  • A PC or laptop running 64-bit (AMD64) Ubunutu (or a variant) version 18.04.1 (kernel 4.15.0.43-generic)
  • An internet connection
  • Root privileges on your device
  • The Epson Perfection V200 linux drivers downloaded to your PC (from here, or a mirror here)

Process

  1. Extract the tar archive to somewhere on your system (for example in a folder under /home/)
  2. Open up your terminal and change the directory to the folder you have extracted
  3. Run sudo .\install.sh
  4. Allow the script to run
  5. If you open your application menu under Graphics you should now see an item Image Scan! for Linux and GIMP (if not already installed)
  6. In the terminal type sudo nano /etc/sane.d/dll.conf (you can use your preferred text editor if you wish, such as vi)
  7. This now should display a long list of what appear to be manufacturers, move down the list using your keyboard cursor keys to the line epson. Put a # symbol on the lines epson, epson2, epsonds. Then make a new line after #epson and type in epkowa
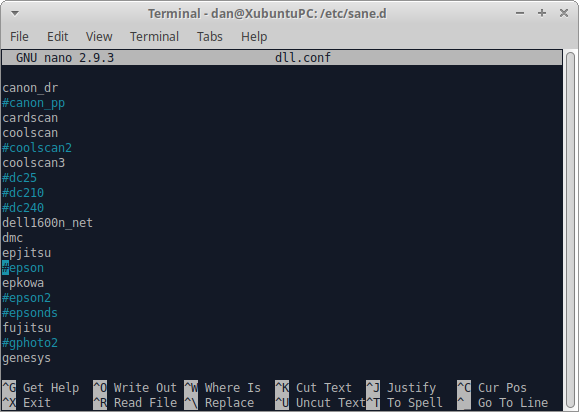
    1. Check that the file matches the following format in the picture below:
  8. Save the changes made to the file and exit
  9. Type in the terminal sudo nano /etc/sane.d/epkowa.conf
  10. Under the section titled # Detect all devices supported by the backend there should be two lines usb and scsi – ensure these are not commented out (by the use of a #) and then close the document
  11. Back at the terminal now type in the command sudo ln -sfr /usr/lib/sane/libsane-epkowa* /usr/lib/x86_64-linux-gnu/sane
  12. Now type in sudo nano /etc/udev/rules.d/55-epson-libsane.rules
  13. You should be in a blank document, copy in the following text:
    1. SUBSYSTEM==”usb”, ENV{DEVTYPE}==”usb_device”, MODE==”0666″
      SUBSYSTEM==”usb_device”, MODE==”0666″ATTRS{manufacturer}==”EPSON”, DRIVERS==”usb”, SUBSYSTEMS==”usb”, ATTRS{idVendor}==”04b8″, ATTRS{idProduct}==”*”, MODE=”0666″

      ATTRS{idVendor}==”04b8″, ATTRS{idProduct}==”0137″, MODE=”0666″, GROUP=”scanner”, ENV{libsane_matched}=”yes”

  14. Save the file and exit
  15. Now back at the terminal prompt type in sudo cp /etc/udev/rules.d/55-epson-libsane.rules /lib/udev/rules.d/
  16. Disconnect and power off the scanner (best to do this at the wall as I know the V200 goes into a “sleep state” sometimes that looks like it is off). Now reconnect everything and restore the power to the scanner by holding down the power button on the unit.
  17. Now open the Simple Scan application and then open Document and then Preferences
  18. After a short period the Scanner drop-down should populate with Epson Perfection V200. It the drop-down appears Epson then you must check that Epson is commented out of the dll.conf file!
  19. Begin to scan your documents

Explanation

I am in no way a Linux pro. Actually I am very new to the operating system so I won’t be able to explain exactly what is happening in this process like I normally can.

My understanding is that the V200 requires the Epkowa “driver” not any of the Epson named drivers. Although it looks like the system knows its a scanner you will probably end up encountering a communication error if you try to use any other configuration with sane. Sane (Scanner Access Now Easy) is an Linux API for scanners – its man page is here. All we are doing in this process is loading in a different configuration that works with the Epson.

Now the only other scanner I have to use is the HP All in One which I currently have disconnected to avoid any confusion. I would assume these changes won’t have any affect on the operation of the scanner of the HP – I will come back and edit this article if it does. However I cannot guarantee how well this would work if you (for whatever reason) had multiple Epson scanners or other flatbeds.

This document ended up being envisioned as only taking a mere 30 minutes to complete, to multiple hours. Firstly I had done something very silly and not backed up my files before making changes, this mean that although I had got everything working I had no way to see what had changed and what needed to be changed to get it working (avoiding the process including unnecessary steps). After restoring back to a factory sane setup I started over but kept running into the issue where sane would only detect the scanner as an “EPSON” device and not the “Epson Perfection V200”. I also found that a few of the steps I thought were necessary (such as finding the scanner’s ID) didn’t need to be run. With the setup above we simply ask the Epkowa driver to connect and search through all connected scanners to see which one it is compatible with. I would assume that if we had multiple scanners on this system this task may take a while to complete. You could probably override this as the Epkowa.conf file appears to have a section where you can manually specify the product id (you retrieve this information by running sudo sane-find-scanner).

Well I’ve got some scanning to do, I was intending on getting a few other bits done tonight but that looks to have gone out of the window. I will try and keep this article updated as the version of Ubuntu goes along and for as long as I have the scanner. I hope to do more articles that are similar later on in the year, not always for scanners but other USB equipment.


Add More Clip Art in Office 97 (Windows 10)

If you have managed to successfully install Microsoft Office 97 onto your Windows 10 computer, and have followed my previous guide on how to get the Clip Art Gallery working then you (like myself) probably felt a little deflated when you opened it up to find only a meagre 79 clips.

In this guide I will show you how to end up with over 3,000 clips for free, complimentary of Microsoft themselves without the requirement for any dodgy downloads or needing to manually catalogue each clip.

The Problem

The problem we are trying to fix in this guide is simple, not enough clips! And let’s be honest if you’ve got this far and gone to this much trouble to get Clip Art working under Windows 10 you’ll probably want all the clips you can get, right?

Assumptions/Prerequisites

The following assumptions are being made:

  • You are using either Windows 10 build 1809 or 1803
  • The version of Windows you are using is of 64-bit architecture
  • You have installed Office 97 and selected the Clip Gallery and Popular Clipart options
  • You have installed Office 97 with one or more applications enabled: Word, Excel, PowerPoint, Publisher
  • At time of installation you left the installation location to its default path of C:\Program Files (x86)\Microsoft Office
  • You have administrative rights over your PC
  • You have the original Office 97 Standard CD-ROM (or a disc image of the CD-ROM)

The Fix

These instructions should, once completed, change the behaviour of the Clip Gallery in all Microsoft Office programs that support Clip Art. We are simply using Microsoft Word as the default example.

  1. Open File Explorer by launching it from the task bar or by clicking Start and typing This PC
  2. Insert (or mount if using a disc image) the Office 97 Standard CD-ROM. Open the CD-ROM’s contents in Explorer by right clicking the CD-ROM device in This PC and then choosing Open from the context menu.
  3. Open the folder CLIPART. Using your keyboard and mouse, hold SHIFT and then left-click on the first folder (Bullets). While still holding the SHIFT key click on the last folder SCRBEANS.
  4. With these folders selected either press CTRL + C on your keyboard or right-click on a selected folder and choose Copy from the context-menu.
  5. Click on the Local Disk (C:) option from the left-hand pane in Explorer, then drill down the folder structure by opening Program Files (x86) and then Microsoft Office then Clipart. In a white space right-click and choose Paste from the context-menu.
  6. Explorer will then begin to calculate the amount of files it needs to copy. It will identify 80 duplicate files (which are the 79 clips you see already, plus 1 CAG file), choose the option Skip these files.
  7. You will then be asked to give Administrator Permission to complete the copy process. Tick the Do this for all current items checkbox and then click on the Continue button, you may be asked to enter the credentials of an administrator account.
  8. Explorer will now begin to copy the files across from the CD-ROM to your local disk drive. This process may take a few minutes depending on the speed of your hard disk drive and if you are using a CD-ROM or a disc image as the source for the copy.
  9. With the copy completes, open Microsoft Word 97. Open the Clip Gallery by choosing Insert then Picture and finally Clip Art from the menu bar.
  10. Don’t be disappointed, when you open up Clip Gallery it will still only show 79 items. However we now need to import the additional 4,000 clips in. Click on the Import Clips button.
  11. The Add clip art to Clip Gallery dialog box will then appear. Change set the Files of type drop-down to Clip Gallery Packages (should be last in the list) and then click the directory level up button (folder with an arrow pointing upwards) – you should now be in the Clipart folder.
  12. Open the folder OFFICE and select the only CAG file present. Click Open to load the file into Clip Gallery, you should then receive a message confirming the package has been added to the Clip Gallery and that you will need to quit and restart the Clip Gallery to view the new items.
  13. Click OK to dismiss the confirmation message. and then close the Clip Gallery by choosing the Close button. Re-open the Clip Gallery (Insert then Picture and finally Clip Art).
  14. You should now see that you have 2079 clips available under the Clip Art tab. You can add more content by clicking Import Clips and adding the CAG files found in the folders PHOTOS, POWERPNT and SCRBEANS (closing and re-opening Clip Gallery with each action). Under the Pictures tab you should have 144 items. The Sounds and Videos tabs will likely still show 0 items. You can increase this number by importing the CAG file under MMEDIA however you will find at the moment you are unable to preview or insert any of these items.

Summary

If you have followed the above steps you should now have just over 3,000 additional clips in your Clip Gallery. More clips could be added from later versions of Office if they have the .CAG file present, or from third party compilations.

What is nice is that because clip art uses mostly vector technology, the clips can scale to the large HD resolutions that we operate today without corruption or degradation of quality.

Although it is a shame that at the moment I cannot get the audio-clips or video-clips to operate – the 3,000 clips should certainly keep any one keen on a nostalgia trip happy for some time.

Explanation of Fault

Around the time that Office 97 was released, hard disks were still on the small size in comparison to today’s 100’s if not 1000’s of terabytes of storage. For this reason many items of computer software (including video games) would often keep a lot of their media assets (such as graphics, videos and sound files) on the CD-ROM, instead of copying the content to the local hard disk drive. This would mean that for some of these items of software to operate, or for the user to experience the full feature set of an application (such as Microsoft Office) they would need to keep the CD-ROM handy or in their CD-ROM drive during use.

Although when you consider that the content we have copied here only amounts to a measly 86.7 MB (on disk) – this could be considered a serious amount of free space lost for most computer users in 1997.

There really isn’t any further explanation needed as to why Office 97 included (by default) such a small amount of clips – it was simply a design choice to reflect the needs of users at the time.

Guide – Get Clip Art (Clip Gallery 3.0) for Office 97 Working with Windows 10

This guide will quickly explain how to get Microsoft Clip Gallery 3.0 (included with the Office 97 suite) working under Windows 10.

By following this guide you will be able to import clip-art items into your documents, spreadsheets, publications or presentations with any of the following Office 97 applications:

  • Word 97
  • PowerPoint 97
  • Excel 97
  • Publisher 97

The Problem

This guide addresses the following errors or problems you may be facing.

  • Error dialog: The Clip Gallery encountered an error. Try restarting Windows, or reinstalling Microsoft applications.
  • Error dialog: The Clip Gallery can not run because the database file has been marked read-only. Use File Manager or the Explorer to locate ARTGALRY.CAG, and remove the read-only file property.

  • Display issue: The clip gallery is empty, no clip art is available or visible for selection/insertion.

Assumptions/Prerequisites

The following assumptions are being made:

  • You are using either Windows 10 build 1809 or 1803
  • The version of Windows you are using is of 64-bit architecture
  • You have installed Office 97 and selected the Clip Gallery and Popular Clipart options
  • You have installed Office 97 with one or more applications enabled: Word, Excel, PowerPoint, Publisher
  • At time of installation you left the installation location to its default path of C:\Program Files (x86)\Microsoft Office
  • At time of installation you left the program group value to its default value of “Microsoft Office
  • You have administrative rights over your PC

The Fix

In this series of instructions we use Microsoft Word as the application to be used with Clip-Art. For other applications such as Excel, PowerPoint or Publisher please read their names instead of Word in this guide.

  1. Open File Explorer by launching it from the task bar or by clicking Start and typing This PC
  2. Click in the address bar and paste the following string:
    %appdata%\Microsoft\Windows\Start Menu\Programs\Microsoft Office
  3. Tap enter to go to the above location.
  4. Select Microsoft Word and right click, choose Properties from the context menu.
  5. With the Properties window open choose Compatibility and tick the option Run this program as an administrator under the Settings header
  6. Click OK to save changes.
  7. Run Microsoft Word by starting it from your Start Menu⚠ You may have to accept/dismiss a UAC/Administrator prompt when opening Microsoft Word ⚠
  8. With Microsoft Word running open the Clip Gallery by choosing InsertPictureClip Art…
  9. The Microsoft Clip Gallery 3.0 should now open with a selection of clips.

If the Clip Gallery is Empty

  1. Click on the Import Clips… button in the Microsoft Clip Gallery 3.0
  2. An Add clip art to Clip Gallery dialog will open
  3. Click the Look in: drop-down menu and change the option to Local Disk (C:)⚠ Your C: drive may have a name different to Local Disk, choose the disk that is assigned the letter C ⚠
  4. Open the folder Program Files (x86) and then Microsoft Office and then Clipart and finally Popular
  5. Press CTRL + A on your keyboard to select all the files in the folder and then click Open
  6. Clip Properties dialog window will now open. Tick Add all clips to the selected categories and then choose OK
  7. You will then see another dialog box The Clip Gallery Package has been added to Clip Gallery. You must quit and restart Clip Gallery to view the new package –click OK to dismiss this message
  8. Close the Microsoft Clip Gallery 3.0 window, and then re-open it from Word (InsertPictureClip Art…). The Clip Gallery should now show any clips you have imported.

Summary

If you have followed the above steps you should now be able to easily add in the clip-art that is included with your Office installation into documents, spreadsheets, presentations and publications.

By default the Office 97 installer only installs 79 Clip Art clips – no pictures, sounds or videos. If you have the Microsoft Office 97 Standard Edition CD-ROM available you can increase this number to over 4,000 clips easily by following this guide here.

Explanation of Fault

Although I am not affiliated with Microsoft in any way, I do have a good grasp on how their modern operating systems work and what issues these may pose to applications that are over 20 years old.

Modern Windows operating systems (starting with Vista through to 10, including 7, 8 and 8.1) implement a stricter security system to all operating systems to prevent the unauthorised installation of software, modification of system files or access to personal documents. Although this security system does help prevent unauthorised access from other individuals in your home or office, the main purpose of this security system is to prevent malware (such as viruses) to infect, corrupt or otherwise modify system files without your explicit approval.

When the Office 97 suite was implemented security was rather archaic, and UAC simply did not exist. When the Office 97 suite installs the applications, including the Clip Gallery and clips to your disk it places the files in areas that Windows considers by default “secure” locations. This means that when you try to open an application such as Word without elevating the application with an administrator prompt (such as UAC) it does not have security clearance to amend these files. By elevating the application you are granting that application (or process, in this case WINWORD.EXE) full security clearance to those protected locations.

The Clip Gallery uses a simple database file know as a CAG file (Clip Art Gallery Package file). This file is usually empty when it is installed, and needs to be populated. If the process, in this case WINWORD.EXE, does not have write access to this file (due to not being elevated) then the application will either throw a critical system error message or simply enter the Not Responding state.

What we do in this process is set the WINWORD.EXE process to always request to be elevated. Upon the next execution of the application we are prompted with a UAC Prompt to allow this elevation. From here the process can access the CAG file and modify it as necessary.

Although it is likely that an application as simple as WINWORD.EXE would not make any dangerous changes to system files, it is best practice to avoid constantly running the application with elevated privileges. However you will likely find that if you don’t elevate the process you will not be able to insert any further clip-art until you elevate WINWORD.EXE.

I could tell that it was likely a security permission issue that was causing this fault, however I did evidence my findings by using Sysinternals Process Monitor which confirmed that the WINWORD.EXE process was unable to open the CAG file for amendment.