Category Archives: Computing

Everything about computers – from new to old. Help guides to general trivia pieces.

Hewlett Packard Vectra VL400 Drivers and Utilities

As many legacy computer enthusiast knows, these days with the amount of general trash online along with the general disregard for history from many hardware vendors, drivers are slowly becoming more and more difficult to obtain for devices of the XP era and before.

To assist my brothers and sisters in this plight to keep these old beige boxes rocking and not being turned into tin cans, I am sharing drivers for many of the devices that I own. All drivers provided here are as-is, they are without bloated (and possibly malicious) “downloaders” and are the real deal. I make no profit from redistributing these files, I am simply doing my bit to keep these devices operational.

All drivers listed below have been tested and confirmed operational with my Hewlett Packard Vectra VL400 computer.

Windows 98SE Drivers

Drivers for Microsoft Windows 98 Second Edition. Other operating systems may be supported if listed.

Disk Controller / IDE

The HP Vectra VL400 has an on-board Intel IDE disk controller.

Devices Covered Intel 80801AA Ultra ATA Controller
Intel 82801AA Ultra ATA Controller
Intel 82801AB Ultra ATA Controller
Intel 82801BA Ultra ATA Controller
Driver / Package Version 6.01.007 (from disk.txt)
Operating Systems Supported Windows 98
Windows 98 Second Edition
Windows NT 4.0
Supported Languages English, Chinese PRC, Chinese Taiwan, Danish, Dutch, Finnish, French Canadian, French Standard, German, Italian, Japanese, Korean, Norwegian, Polish, Portuguese Brazilian, Portuguese Standard, Russian, Spanish, Swedish, Thai
Date of Newest File in Package 28th December 2000 (setup.exe)
Date of Oldest File in Package 28th August 2000 (Setup.iss)
Setup Executable Present Yes (Setup.exe)
Driver INF File No
List of Files 98_to_ME.doc
DATA1.CAB
DATA1.HDR
DATA2.CAB
DISK.TXT
IATA2000.CAT
IKERNEL.EX_
INTELATA.CAT
LANGUAGE.TXT
LAYOUT.BIN
README.TXT
SETUP.BMP
SETUP.EXE
SETUP.INI
SETUP.INX
SETUP.ISS
setupcfg.sys
whatsnew.doc
Total File Count 18 files
Package Size 4.89 MB
Extracted Package Size 5,742,578 bytes
Package Archive Type ZIP
Other Notes whatsnew.doc:

  • informs us that chipset driver ITL2320a must be installed first
  • informs us that the HP version number is INT6001B
  • informs us of the following flags available to setup.exe
    • -S to silent install
    • -B to force reboot
    • -P to specify install path
    • -A to extract files
    • -N to install all components but driver
  • this driver includes the following fixes
    • Chinese input method problem under win98
      In Win98 taskbar, there is an icon for “Chinese Input Method” under which there is “Intelligent ABC input”. In some cases, this icon is not correct and an error message appears if you click on it. It is then impossible to enter Chinese. This driver fixes this problem.
    • Corruption of Win98 boot registry
      The issue with the Registry access error message was that after installing version 5.01 (and possibly version 5.0) of the Intel(R) Ultra ATA Storage Driver and rebooting the system, a Registry access error message might occur. The error message would appear immediately after Windows 98 or Windows 98 Second Edition (SE) had finished loading (ie. all the icons and the taskbar appeared). This occurred randomly on systems with the Intel®810, Intel® 810E, Intel® 820, and possibly Intel® 815 chipsets
  • this driver has the following known issues for Windows 98 and 98 Second Edition
    • In the case when a controller is removed and a “have disk” installation method is needed, a blue screen (BSOD) error may occur. Recommended workaround is to go into Safe mode and install using InstallShield.
    • Using McAffee VirusScan 4.0.0 with Scan Engine 3.2.0, the HDD may not spin down when manually set using the ContolPanel power applet. This problem does not show with McAffee VirusScan 4.0.3 with ScanEngine 4.0.35.
    • Due to compatibility issues supporting early 1x CD-ROMs under ACPI S3 resume, only CD-ROM devices that support DMA transfer modes should be connected to the system when using this driver.
    • For performance reasons, PIO-only devices should not be slaved to high-performance DMA-capable devices such as hard disk drives, since the Intel Ultra ATA Storage Driver limits channel block transfer sizes from 64KB to 32KB for the entire channel to which an PIO-only device is connected. PIO-only devices are devices that only support PIO transfer modes, and do not support DMA transfer modes, e.g., LS-120, ZIP100).
    • Uninstalling under Windows 98 does not restore the previous DMA checkbox settings for either ATA channel.
    • Migrating to WinME will lead to a blue screen. uninstall Intel driver before upgrating to Millenium. see 98_to_ME.doc file.
  • this driver has the following known issues for Windows NT 4.0
    • Installing via SETUP under Windows NT4.0 causes “IDE CD-ROM (ATAPI 2.1) DUAL-CHANNEL IDE CONTROLLER [not started]” to show in the SCSI Adapters applet. Instead, the text should read, “Intel Ultra ATA Controller [started]”. A workaround is to run the SETUP program with the -A setup flag, and manually install the Windows NT4.0 driver using the SCSI Adapters applet in Control Panel.
  • this driver has the following known limitations
    • Installation on Windows NT 4.0 requires the user be logged on with Administrator rights.
Download Link Dans-Things.com

How to read this table?

Graphics/Video

The HP Vectra VL400 has an on-board Intel 815 graphics chip. This outputs to a VGA connector mounted on the motherboard.

Devices Covered Intel 810
Intel 810E
Intel 815
Intel 815B
Intel 815E
Intel 815EM
Driver / Package Version 4.03.1381.2732 (from readme.txt)
Operating Systems Supported Windows 95 (all versions)
Windows 98
Windows 98 Second Edition
Windows Millennium Edition
Supported Languages English, Mainland Chinese, Traditional Chinese, Danish, German, International English, Spanish, Finnish, French, French Canadian, Italian, Japanese, Korean, Dutch, Norwegian, Polish, Brazilian Portuguese, Portuguese, Russian, Swedish, Thai
Date of Newest File in Package 21st May 2001 (whatsnew.doc)
Date of Oldest File in Package 5th October 2000 (Ikernel.ex_)
Setup Executable Present Yes (Setup.exe)
Driver INF File Yes (Win9X\I81xw9x.inf)
List of Files
 DATA1.CAB
DATA1.HDR
DATA2.CAB
DISK.TXT
IKERNEL.EX_
INSTALL.CFG
INTEL_Release_note.txt
LAYOUT.BIN
README.TXT
SETUP.EXE
SETUP.INI
SETUP.INX
SETUP.ISS
whatsnew.doc
├───SUPPORT
│ CFGMGR32.DLL
│ SETUPAPI.DLL
│ SHPSHFTR.DLL
│ SIGNTIME.DLL
└───WIN9X
│ADV01W9X.DLL
│ADV02W9X.DLL
│ADV05W9X.DLL
│ATV01W9X.DLL
│ATV02W9X.DLL
│ATV04W9X.DLL
│ATV06W9X.DLL
│CH7XXW9X.DLL
│HCCUTILS.DLL
│I81X.VXD
│I81X329X.DLL
│I81XDD.DLL
│I81XDW9X.DRV
│I81XGDEV.DLL
│I81XGHLP.EXE
│I81XGICD.DLL
│I81XW9X.CAT
│I81XW9X.INF
│IGFXCFG.EXE
│IGFXCPL.CPL
│IGFXDEV.DLL
│IGFXDGPS.DLL
│IGFXDIAG.EXE
│IGFXEUD.DLL
│IGFXHCHS.LHP
│IGFXHCHT.LHP
│IGFXHDAN.LHP
│IGFXHDEU.LHP
│IGFXHENG.LHP
│IGFXHENU.LHP
│IGFXHESP.LHP
│IGFXHFIN.LHP
│IGFXHFRA.LHP
│IGFXHFRC.LHP
│IGFXHITA.LHP
│IGFXHJPN.LHP
│IGFXHKOR.LHP
│IGFXHNLD.LHP
│IGFXHNOR.LHP
│IGFXHPLK.LHP
│IGFXHPTB.LHP
│IGFXHPTG.LHP
│IGFXHRUS.LHP
│IGFXHSVE.LHP
│IGFXHTHA.LHP
│IGFXPPH.DLL
│IGFXRCHS.LRC
│IGFXRCHT.LRC
│IGFXRDAN.LRC
│IGFXRDEU.LRC
│IGFXRENG.LRC
│IGFXRENU.LRC
│IGFXRESP.LRC
│IGFXRFIN.LRC
│IGFXRFRA.LRC
│IGFXRFRC.LRC
│IGFXRITA.LRC
│IGFXRJPN.LRC
│IGFXRKOR.LRC
│IGFXRNLD.LRC
│IGFXRNOR.LRC
│IGFXRPLK.LRC
│IGFXRPTB.LRC
│IGFXRPTG.LRC
│IGFXRRUS.LRC
│IGFXRSVE.LRC
│IGFXRTHA.LRC
│IGFXSRVC.DLL
│SIIW9X.DLL
│VCHW9X.DLL
│VGARTD.VXD
Total File Count 89 files
Package Size 5.75 MB
Extracted Package Size 15, 849, 599 bytes
Package Archive Type ZIP
Other Notes whatsnew.doc:

  • mentions Windows NT 4.0, Windows 2000 RTM, Windows 2000 SP1 but is not clear if these are supported. Information regarding these operating systems is omitted below.
  • refers to the drivers included here as “Intel version: 6.02”
  • refers to this package as being “HP version number: 815b_602”
  • suggests silent install can be achieved by running setup -s
  • confirms the driver is certified by Microsoft
  • notes the following limitations with this version
    • If an AGP card is used in the system, the integrated graphics is automatically disabled
    • You must set 16bit z-buffer within 3DWinbench2000 to run benchmark
    • 32bpp color depth is not supporte
    • Intel ICD OpenGL acceleration is disabled. ICD is a part of the driver which accelerates Open GL. It is not a problem to disable it, as OpenGl applications can still be executed through a Microsoft layer in the Operating System. Disabling ICD makes the driver much more stable. Note that this will not be effective if previously installed driver had OpenGL enabled!
    • Un-installation does not work with add-remove program. It needs to be done with the device manager.
  • informs us this driver supports
    • B stepping of the 815e chipset
    • DirectX 8
  • informs us this driver changes
    • 2D performance improved by 30% without AIMM video module (5.05 / 5.06)
    • Intel ICD OpenGL acceleration is disabled (W9x)
  • informs us this driver fixes
    • incompatibility between Intel video drivers and drivers for PCI video cards (for example Matrox G450)
  • informs us this driver fixes for Windows 95 and Windows 98
    • Win98 Second edition, in some cases, the PC cannot come back from standby mode
    • DVD doesn’t play in 2014×768, 16bpp, 75Hz
  • informs us this driver has known issues including
    • color corruption in 8bpp after OpenGL screensaver preview for Windows 95 and 98
    • point sprites (DX8 feature) does not have the particle effects
    • antipoly (antialiasing) demo does not run (remains black)
Download Link Dans-Things.com

How to read this table?

Sound/Audio

The HP Vectra VL400 has an on-board audio chip provided by Crystal Semiconductor. It provides one audio output (Line-Out), and two audio inputs (Microphone, Line-In) on the motherboard.

Devices Covered Crystal ????
Driver / Package Version 5.12.01.4024 (from cwawdm.inf)
Operating Systems Supported Windows 98 Second Edition
Supported Languages English
Date of Newest File in Package 12th April 2001 (whatsnew.doc)
Date of Oldest File in Package 21st April 2000 (cwawdm.inf)
Setup Executable Present No
Driver INF File Yes (cwawdm.inf)
List of Files cwawdm.inf
cwawdm.sys
DISK.TXT
Pw4024.cat
whatsnew.doc
Total File Count 5 files
Package Size 0.04 MB
Extracted Package Size 114,688 bytes
Package Archive Type ZIP
Other Notes whatsnew.doc:

  • informs us the HP version number of this package is PW4024R
  • informs us the drivers contained here were previously available under package name QBIKU006
  • informs us that
    • this driver only supports Windows 98 Second Edition, it does not support Windows 98
    • driver installation is achieved by way of Device Manager, as no setup wizard is included
    • this the first official AC’97 Candidate driver released by HP for this audio solution
  • states the following known issues
    • Audio may stutter briefly before it resumes completely from Suspend mode.
    • Media Player 2 might stops playing audio after system resumes.
    • 8 Bits recording failure.
    • Some systems may undergo problems with CD player application when using digital CD support.
    • In Win98 SE, Crackles when moving volume sliders while playing MIDI files.
  • states the following known limitations
    • SW Synth slider jumps to max value, when Synth state is switched from Stop to Play or viceversa.
    • Can’t enable Fastforward and Rewind Controls in the Media Player.
    • Digital CD Audio is recorded by loopback mux selection.
    • No MIDI till the system is restarted.
    • No Volume icon on the systray till the system is restarted
Download Link Dans-Things.com

How to read this table?

Guide – How To Get Epson Perfection V200 Photo Flatbed Scanner Working with Ubuntu 18.04.1

This guide will explain how to get the Epson Perfection V200 Photo flatbed scanner to work with Ubuntu 18.04.1 (64-Bit/AMD64).

Introduction (Unnecessary Story)

A little while ago I bought a flatbed scanner. It’s something I’ve always wanted since I was a young lad, because I was ultimately a strange child. I do a lot of scanning as part of my hobbies relating to archiving documents and print items. For years I have used the scanners built into various all-in-one scanner devices, but a few months ago I got so fed up constantly getting up and down to swap over documents that I said “Enough! I must buy myself a flatbed”. I made my way over to the online car boot that is Facebook Marketplace and performed a few searches. Amazingly enough there are quite a few people selling scanners. Some people wanted insane amounts for really old (like Windows 98 era) flatbeds – but eventually I found someone who had what looked like a reasonably modern model for the small sum of £5. A few days later I turn up and collect the scanner (which included a nice Belkin USB A to B cable) and that’s the end of that.

As part of my move away from Windows 10 as my primary OS to Xubuntu (see this series of posts) – I am trying to see how many of my peripherals work with the operating system. Unfortunately the Epson scanner isn’t as plug and play as my new HP All-in-One printer (which works without any fiddling) but after a few forum posts and learning a little bit on how USB scanners work in Ubuntu I finally got it working.

(If you care, the scanner works without any issue in Windows 10)

Prerequisites

You will need for this process:

  • An Epson Perfection V200 Photo flatbed scanner with USB A to B cable
  • A PC or laptop running 64-bit (AMD64) Ubunutu (or a variant) version 18.04.1 (kernel 4.15.0.43-generic)
  • An internet connection
  • Root privileges on your device
  • The Epson Perfection V200 linux drivers downloaded to your PC (from here, or a mirror here)

Process

  1. Extract the tar archive to somewhere on your system (for example in a folder under /home/)
  2. Open up your terminal and change the directory to the folder you have extracted
  3. Run sudo .\install.sh
  4. Allow the script to run
  5. If you open your application menu under Graphics you should now see an item Image Scan! for Linux and GIMP (if not already installed)
  6. In the terminal type sudo nano /etc/sane.d/dll.conf (you can use your preferred text editor if you wish, such as vi)
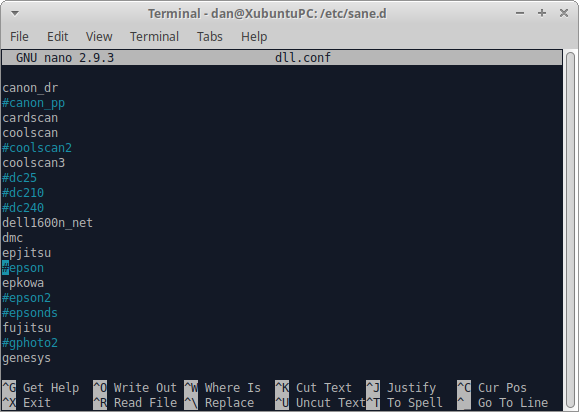
  7. This now should display a long list of what appear to be manufacturers, move down the list using your keyboard cursor keys to the line epson. Put a # symbol on the lines epson, epson2, epsonds. Then make a new line after #epson and type in epkowa
    1. Check that the file matches the following format in the picture below:
  8. Save the changes made to the file and exit
  9. Type in the terminal sudo nano /etc/sane.d/epkowa.conf
  10. Under the section titled # Detect all devices supported by the backend there should be two lines usb and scsi – ensure these are not commented out (by the use of a #) and then close the document
  11. Back at the terminal now type in the command sudo ln -sfr /usr/lib/sane/libsane-epkowa* /usr/lib/x86_64-linux-gnu/sane
  12. Now type in sudo nano /etc/udev/rules.d/55-epson-libsane.rules
  13. You should be in a blank document, copy in the following text:
    1. SUBSYSTEM==”usb”, ENV{DEVTYPE}==”usb_device”, MODE==”0666″
      SUBSYSTEM==”usb_device”, MODE==”0666″ATTRS{manufacturer}==”EPSON”, DRIVERS==”usb”, SUBSYSTEMS==”usb”, ATTRS{idVendor}==”04b8″, ATTRS{idProduct}==”*”, MODE=”0666″

      ATTRS{idVendor}==”04b8″, ATTRS{idProduct}==”0137″, MODE=”0666″, GROUP=”scanner”, ENV{libsane_matched}=”yes”

  14. Save the file and exit
  15. Now back at the terminal prompt type in sudo cp /etc/udev/rules.d/55-epson-libsane.rules /lib/udev/rules.d/
  16. Disconnect and power off the scanner (best to do this at the wall as I know the V200 goes into a “sleep state” sometimes that looks like it is off). Now reconnect everything and restore the power to the scanner by holding down the power button on the unit.
  17. Now open the Simple Scan application and then open Document and then Preferences
  18. After a short period the Scanner drop-down should populate with Epson Perfection V200. It the drop-down appears Epson then you must check that Epson is commented out of the dll.conf file!
  19. Begin to scan your documents

Explanation

I am in no way a Linux pro. Actually I am very new to the operating system so I won’t be able to explain exactly what is happening in this process like I normally can.

My understanding is that the V200 requires the Epkowa “driver” not any of the Epson named drivers. Although it looks like the system knows its a scanner you will probably end up encountering a communication error if you try to use any other configuration with sane. Sane (Scanner Access Now Easy) is an Linux API for scanners – its man page is here. All we are doing in this process is loading in a different configuration that works with the Epson.

Now the only other scanner I have to use is the HP All in One which I currently have disconnected to avoid any confusion. I would assume these changes won’t have any affect on the operation of the scanner of the HP – I will come back and edit this article if it does. However I cannot guarantee how well this would work if you (for whatever reason) had multiple Epson scanners or other flatbeds.

This document ended up being envisioned as only taking a mere 30 minutes to complete, to multiple hours. Firstly I had done something very silly and not backed up my files before making changes, this mean that although I had got everything working I had no way to see what had changed and what needed to be changed to get it working (avoiding the process including unnecessary steps). After restoring back to a factory sane setup I started over but kept running into the issue where sane would only detect the scanner as an “EPSON” device and not the “Epson Perfection V200”. I also found that a few of the steps I thought were necessary (such as finding the scanner’s ID) didn’t need to be run. With the setup above we simply ask the Epkowa driver to connect and search through all connected scanners to see which one it is compatible with. I would assume that if we had multiple scanners on this system this task may take a while to complete. You could probably override this as the Epkowa.conf file appears to have a section where you can manually specify the product id (you retrieve this information by running sudo sane-find-scanner).

Well I’ve got some scanning to do, I was intending on getting a few other bits done tonight but that looks to have gone out of the window. I will try and keep this article updated as the version of Ubuntu goes along and for as long as I have the scanner. I hope to do more articles that are similar later on in the year, not always for scanners but other USB equipment.


Add More Clip Art in Office 97 (Windows 10)

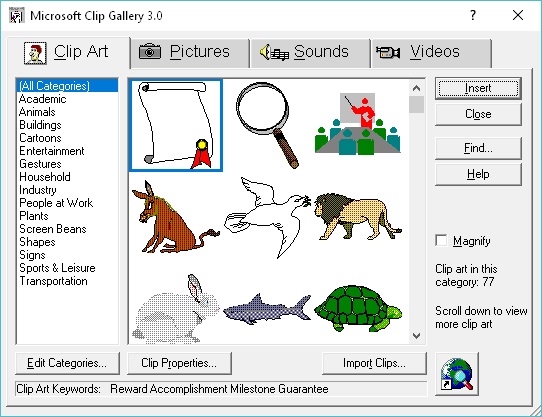
If you have managed to successfully install Microsoft Office 97 onto your Windows 10 computer, and have followed my previous guide on how to get the Clip Art Gallery working then you (like myself) probably felt a little deflated when you opened it up to find only a meagre 79 clips.

In this guide I will show you how to end up with over 3,000 clips for free, complimentary of Microsoft themselves without the requirement for any dodgy downloads or needing to manually catalogue each clip.

The Problem

The problem we are trying to fix in this guide is simple, not enough clips! And let’s be honest if you’ve got this far and gone to this much trouble to get Clip Art working under Windows 10 you’ll probably want all the clips you can get, right?

Assumptions/Prerequisites

The following assumptions are being made:

  • You are using either Windows 10 build 1809 or 1803
  • The version of Windows you are using is of 64-bit architecture
  • You have installed Office 97 and selected the Clip Gallery and Popular Clipart options
  • You have installed Office 97 with one or more applications enabled: Word, Excel, PowerPoint, Publisher
  • At time of installation you left the installation location to its default path of C:\Program Files (x86)\Microsoft Office
  • You have administrative rights over your PC
  • You have the original Office 97 Standard CD-ROM (or a disc image of the CD-ROM)

The Fix

These instructions should, once completed, change the behaviour of the Clip Gallery in all Microsoft Office programs that support Clip Art. We are simply using Microsoft Word as the default example.

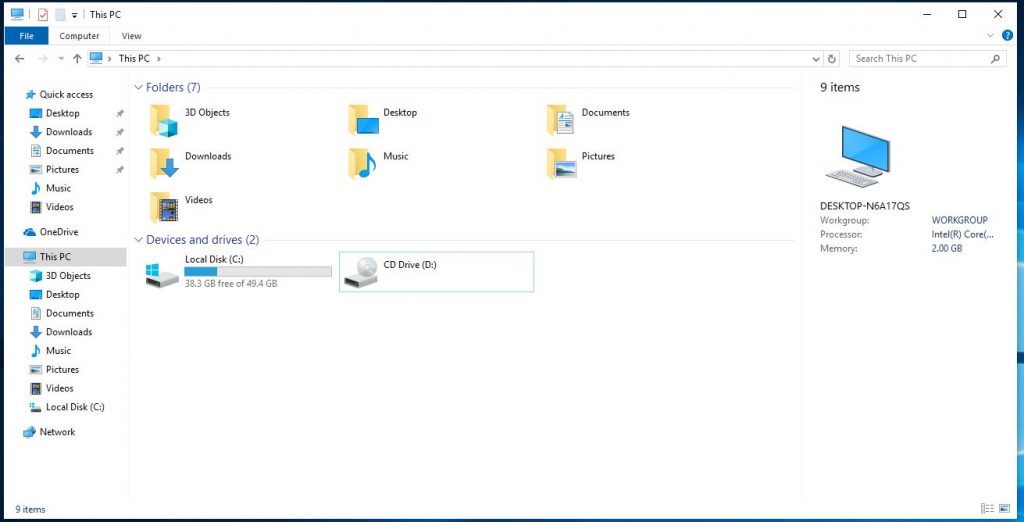
  1. Open File Explorer by launching it from the task bar or by clicking Start and typing This PC
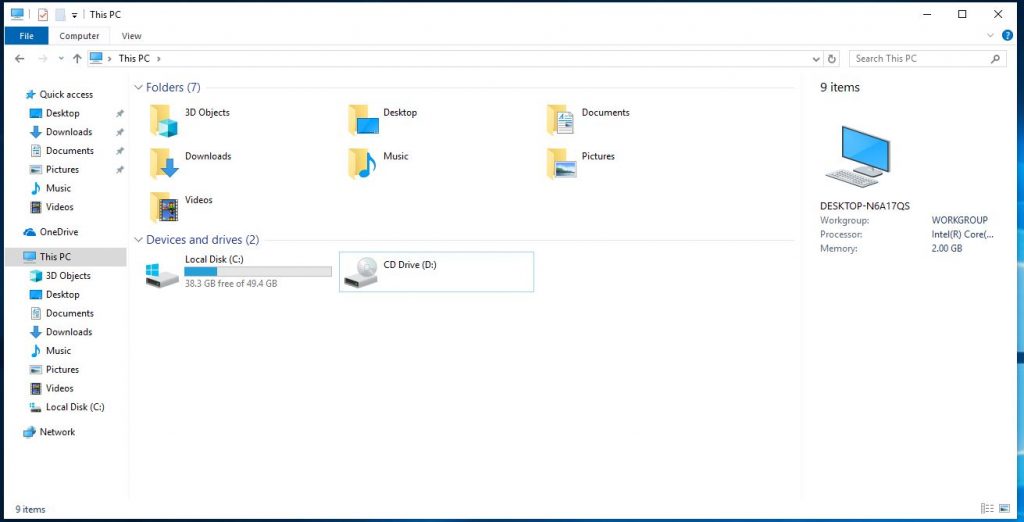
  2. Insert (or mount if using a disc image) the Office 97 Standard CD-ROM. Open the CD-ROM’s contents in Explorer by right clicking the CD-ROM device in This PC and then choosing Open from the context menu.
  3. Open the folder CLIPART. Using your keyboard and mouse, hold SHIFT and then left-click on the first folder (Bullets). While still holding the SHIFT key click on the last folder SCRBEANS.
  4. With these folders selected either press CTRL + C on your keyboard or right-click on a selected folder and choose Copy from the context-menu.
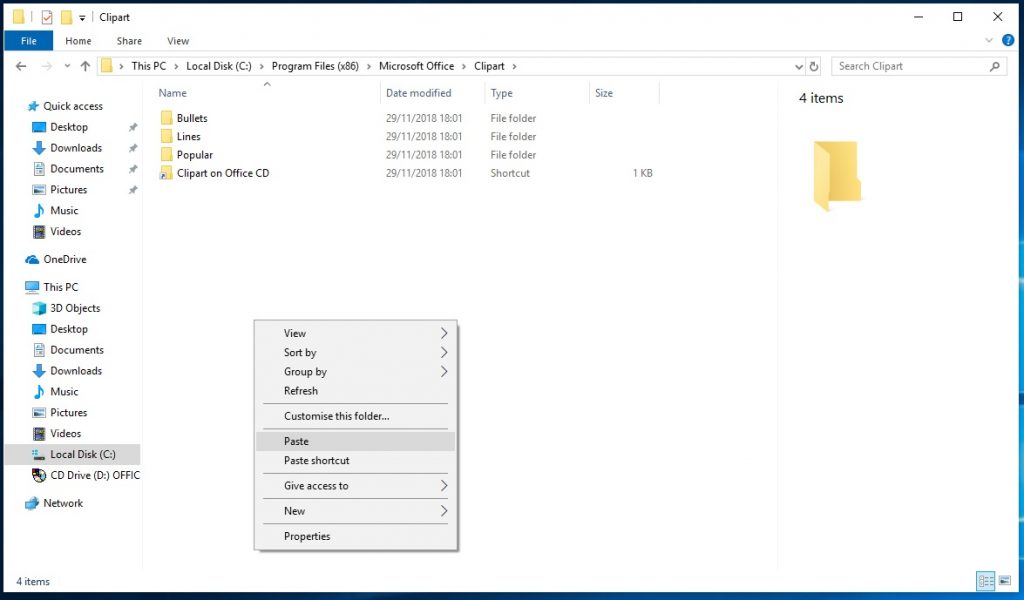
  5. Click on the Local Disk (C:) option from the left-hand pane in Explorer, then drill down the folder structure by opening Program Files (x86) and then Microsoft Office then Clipart. In a white space right-click and choose Paste from the context-menu.
  6. Explorer will then begin to calculate the amount of files it needs to copy. It will identify 80 duplicate files (which are the 79 clips you see already, plus 1 CAG file), choose the option Skip these files.
  7. You will then be asked to give Administrator Permission to complete the copy process. Tick the Do this for all current items checkbox and then click on the Continue button, you may be asked to enter the credentials of an administrator account.
  8. Explorer will now begin to copy the files across from the CD-ROM to your local disk drive. This process may take a few minutes depending on the speed of your hard disk drive and if you are using a CD-ROM or a disc image as the source for the copy.
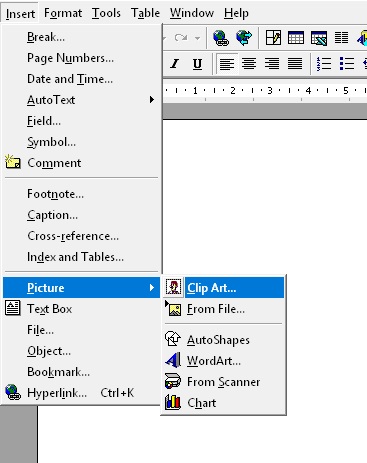
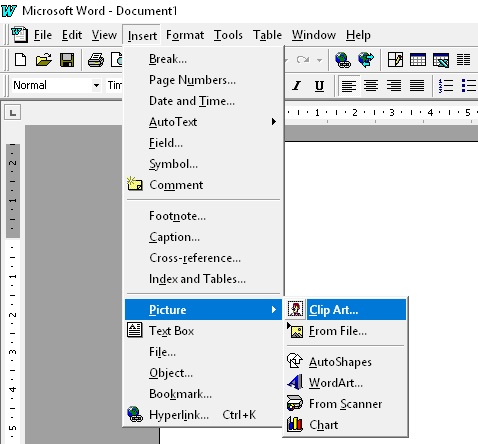
  9. With the copy completes, open Microsoft Word 97. Open the Clip Gallery by choosing Insert then Picture and finally Clip Art from the menu bar.
  10. Don’t be disappointed, when you open up Clip Gallery it will still only show 79 items. However we now need to import the additional 4,000 clips in. Click on the Import Clips button.
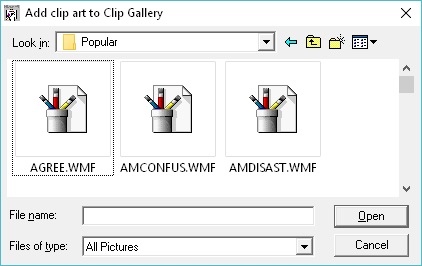
  11. The Add clip art to Clip Gallery dialog box will then appear. Change set the Files of type drop-down to Clip Gallery Packages (should be last in the list) and then click the directory level up button (folder with an arrow pointing upwards) – you should now be in the Clipart folder.
  12. Open the folder OFFICE and select the only CAG file present. Click Open to load the file into Clip Gallery, you should then receive a message confirming the package has been added to the Clip Gallery and that you will need to quit and restart the Clip Gallery to view the new items.
  13. Click OK to dismiss the confirmation message. and then close the Clip Gallery by choosing the Close button. Re-open the Clip Gallery (Insert then Picture and finally Clip Art).
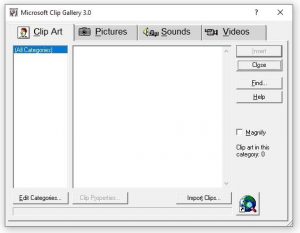
  14. You should now see that you have 2079 clips available under the Clip Art tab. You can add more content by clicking Import Clips and adding the CAG files found in the folders PHOTOS, POWERPNT and SCRBEANS (closing and re-opening Clip Gallery with each action). Under the Pictures tab you should have 144 items. The Sounds and Videos tabs will likely still show 0 items. You can increase this number by importing the CAG file under MMEDIA however you will find at the moment you are unable to preview or insert any of these items.

Summary

If you have followed the above steps you should now have just over 3,000 additional clips in your Clip Gallery. More clips could be added from later versions of Office if they have the .CAG file present, or from third party compilations.

What is nice is that because clip art uses mostly vector technology, the clips can scale to the large HD resolutions that we operate today without corruption or degradation of quality.

Although it is a shame that at the moment I cannot get the audio-clips or video-clips to operate – the 3,000 clips should certainly keep any one keen on a nostalgia trip happy for some time.

Explanation of Fault

Around the time that Office 97 was released, hard disks were still on the small size in comparison to today’s 100’s if not 1000’s of terabytes of storage. For this reason many items of computer software (including video games) would often keep a lot of their media assets (such as graphics, videos and sound files) on the CD-ROM, instead of copying the content to the local hard disk drive. This would mean that for some of these items of software to operate, or for the user to experience the full feature set of an application (such as Microsoft Office) they would need to keep the CD-ROM handy or in their CD-ROM drive during use.

Although when you consider that the content we have copied here only amounts to a measly 86.7 MB (on disk) – this could be considered a serious amount of free space lost for most computer users in 1997.

There really isn’t any further explanation needed as to why Office 97 included (by default) such a small amount of clips – it was simply a design choice to reflect the needs of users at the time.

How To Read Driver Information Tables

Scattered through this website are driver information tables. These will often appear on pages for various items of hardware which are falling out of support from their original vendors.

To give you the confidence in downloading the files, along with generally providing a decent amount of information to help you ensure you are downloading the right thing, a table of information is included for each driver package.

This page will explain how to read such table, and what each section means.

General Rules

All the tables follow these rules

  • Information is gathered from either
    • Text files (.doc, .wri, .txt, .ini) that are included with the driver package
    • Real world experience/tests run by myself
  • If the driver you are looking for is for an operating system that is not listed, there is no guarantee it will work. However, use your knowledge. A driver for Windows 98, may also work for Windows Millenium Edition (ME) or Windows 95. Drivers for Windows 2000 will also likely work for Windows XP. Experiment, but I am in no way liable for any data loss or damage caused by your experimentation.  If you find a driver works with an operating system not listed, leave a comment – it will probably be useful to someone.
  • If an item is in BOLD formatting in the second column this indicates that I have tested this driver package against the highlighted device or operating system. This is my way a seal of approval.
  • Additional information in the second column is presented in parentheses, “( )”. This will usually refer to a file which that data value relates to.
  • Information will be provided in English and all dates are provided in a UK format.
  • Any information that is simply unknown will be marked as such.

Example Table with Explanations

Devices Covered A list of device model/part numbers that this driver package applies too.
Items marked in bold in this list are confirmed as being compatible.
Driver / Package Version This is the overall driver or package version as stated in one of the text documents included with the file. The file which provides the version number will appear in parentheses, “( )”.
Operating Systems Supported A list of operating systems stated in the document that this driver package supports. Operating systems marked in bold are confirmed compatible.
Supported Languages List of languages supported by the driver package.
Date of Newest File in Package It is often telling how new a driver may be by the latest item in the package. It can also indicate whether the driver files have been tampered with. The newest file name will appear in parentheses, “( )”.
Date of Oldest File in Package In the same way we list the newest file, we will also list the oldest file and its name will appear in parentheses, “( )”.
Setup Executable Present We all love the ease of an install wizard. This is a simple Yes/No value that confirms whether such a wizard exists to make installation of the driver easy. The filename of the wizard appears in parentheses, “( )”.
Driver INF File Although setup wizards are very helpful, some experienced folk may prefer to inject the driver INF file into Windows directly. The file name of the INF file will appear in parentheses, “( )”.  An explanation of what an INF file can be found here on FileInfo.com.
List of Files This might be the longest part of the table. This will be a list of all of the files included in the package and the folder structure of the package.
Total File Count The total number of files in the package, useful to check the integrity of the package after a download.
Package Size The size of the compressed package in megabytes.
Extracted Package Size The total file size of all the files once extracted from the package, in bytes.
Package Archive Type The type of archive used for the package. Most will be standard .ZIP files to ensure easy extraction on most Windows installations. However I always recommend people install a compatible archive tool on their OS, certainly for older operating systems such as 95 or 3.11.
Other Notes Any other notes about this package that may be useful. This includes unofficial information or rumors.
Download Link I will primarily host the files here on the website, however I will also try and provide mirrors where possible.


Guide – Get Clip Art (Clip Gallery 3.0) for Office 97 Working with Windows 10

This guide will quickly explain how to get Microsoft Clip Gallery 3.0 (included with the Office 97 suite) working under Windows 10.

By following this guide you will be able to import clip-art items into your documents, spreadsheets, publications or presentations with any of the following Office 97 applications:

  • Word 97
  • PowerPoint 97
  • Excel 97
  • Publisher 97

The Problem

This guide addresses the following errors or problems you may be facing.

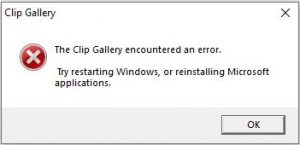
  • Error dialog: The Clip Gallery encountered an error. Try restarting Windows, or reinstalling Microsoft applications.
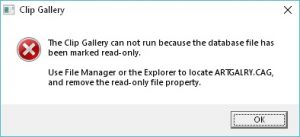
  • Error dialog: The Clip Gallery can not run because the database file has been marked read-only. Use File Manager or the Explorer to locate ARTGALRY.CAG, and remove the read-only file property.

  • Display issue: The clip gallery is empty, no clip art is available or visible for selection/insertion.

Assumptions/Prerequisites

The following assumptions are being made:

  • You are using either Windows 10 build 1809 or 1803
  • The version of Windows you are using is of 64-bit architecture
  • You have installed Office 97 and selected the Clip Gallery and Popular Clipart options
  • You have installed Office 97 with one or more applications enabled: Word, Excel, PowerPoint, Publisher
  • At time of installation you left the installation location to its default path of C:\Program Files (x86)\Microsoft Office
  • At time of installation you left the program group value to its default value of “Microsoft Office
  • You have administrative rights over your PC

The Fix

In this series of instructions we use Microsoft Word as the application to be used with Clip-Art. For other applications such as Excel, PowerPoint or Publisher please read their names instead of Word in this guide.

  1. Open File Explorer by launching it from the task bar or by clicking Start and typing This PC
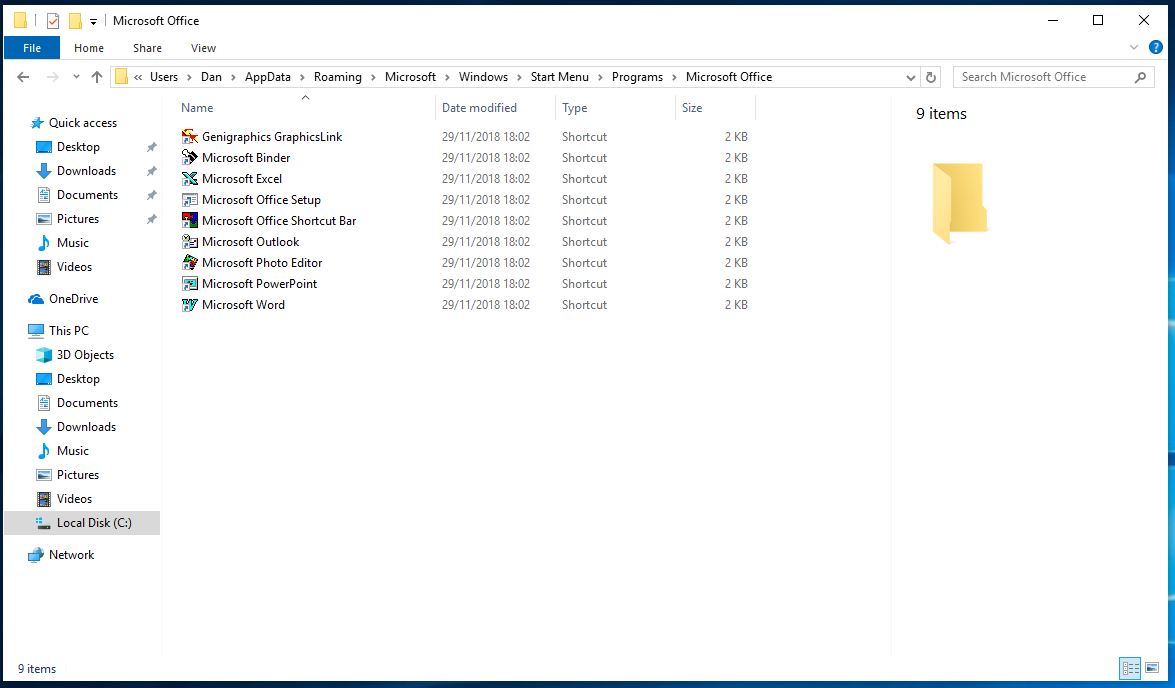
  2. Click in the address bar and paste the following string:
    %appdata%\Microsoft\Windows\Start Menu\Programs\Microsoft Office
  3. Tap enter to go to the above location.
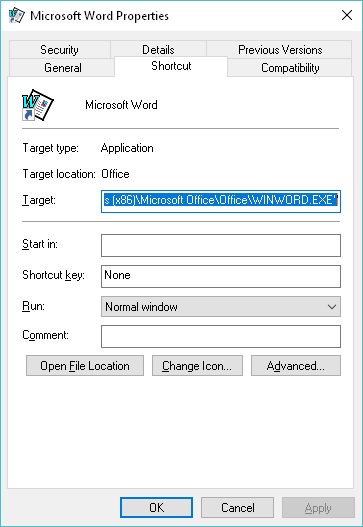
  4. Select Microsoft Word and right click, choose Properties from the context menu.
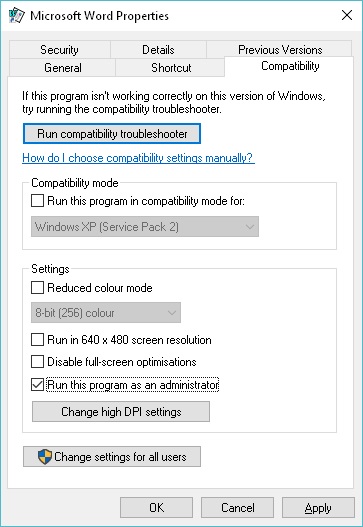
  5. With the Properties window open choose Compatibility and tick the option Run this program as an administrator under the Settings header
  6. Click OK to save changes.
  7. Run Microsoft Word by starting it from your Start Menu⚠ You may have to accept/dismiss a UAC/Administrator prompt when opening Microsoft Word ⚠
  8. With Microsoft Word running open the Clip Gallery by choosing InsertPictureClip Art…
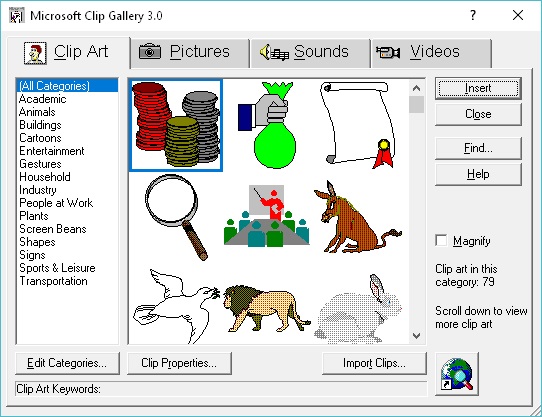
  9. The Microsoft Clip Gallery 3.0 should now open with a selection of clips.

If the Clip Gallery is Empty

  1. Click on the Import Clips… button in the Microsoft Clip Gallery 3.0
  2. An Add clip art to Clip Gallery dialog will open
  3. Click the Look in: drop-down menu and change the option to Local Disk (C:)⚠ Your C: drive may have a name different to Local Disk, choose the disk that is assigned the letter C ⚠
  4. Open the folder Program Files (x86) and then Microsoft Office and then Clipart and finally Popular
  5. Press CTRL + A on your keyboard to select all the files in the folder and then click Open
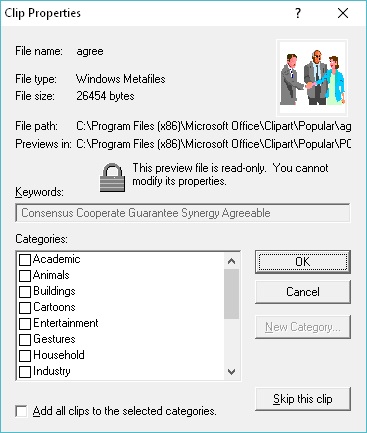
  6. Clip Properties dialog window will now open. Tick Add all clips to the selected categories and then choose OK
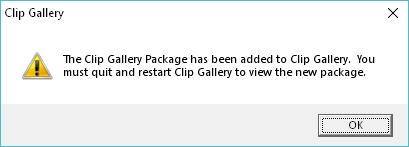
  7. You will then see another dialog box The Clip Gallery Package has been added to Clip Gallery. You must quit and restart Clip Gallery to view the new package –click OK to dismiss this message
  8. Close the Microsoft Clip Gallery 3.0 window, and then re-open it from Word (InsertPictureClip Art…). The Clip Gallery should now show any clips you have imported.

Summary

If you have followed the above steps you should now be able to easily add in the clip-art that is included with your Office installation into documents, spreadsheets, presentations and publications.

By default the Office 97 installer only installs 79 Clip Art clips – no pictures, sounds or videos. If you have the Microsoft Office 97 Standard Edition CD-ROM available you can increase this number to over 4,000 clips easily by following this guide here.

Explanation of Fault

Although I am not affiliated with Microsoft in any way, I do have a good grasp on how their modern operating systems work and what issues these may pose to applications that are over 20 years old.

Modern Windows operating systems (starting with Vista through to 10, including 7, 8 and 8.1) implement a stricter security system to all operating systems to prevent the unauthorised installation of software, modification of system files or access to personal documents. Although this security system does help prevent unauthorised access from other individuals in your home or office, the main purpose of this security system is to prevent malware (such as viruses) to infect, corrupt or otherwise modify system files without your explicit approval.

When the Office 97 suite was implemented security was rather archaic, and UAC simply did not exist. When the Office 97 suite installs the applications, including the Clip Gallery and clips to your disk it places the files in areas that Windows considers by default “secure” locations. This means that when you try to open an application such as Word without elevating the application with an administrator prompt (such as UAC) it does not have security clearance to amend these files. By elevating the application you are granting that application (or process, in this case WINWORD.EXE) full security clearance to those protected locations.

The Clip Gallery uses a simple database file know as a CAG file (Clip Art Gallery Package file). This file is usually empty when it is installed, and needs to be populated. If the process, in this case WINWORD.EXE, does not have write access to this file (due to not being elevated) then the application will either throw a critical system error message or simply enter the Not Responding state.

What we do in this process is set the WINWORD.EXE process to always request to be elevated. Upon the next execution of the application we are prompted with a UAC Prompt to allow this elevation. From here the process can access the CAG file and modify it as necessary.

Although it is likely that an application as simple as WINWORD.EXE would not make any dangerous changes to system files, it is best practice to avoid constantly running the application with elevated privileges. However you will likely find that if you don’t elevate the process you will not be able to insert any further clip-art until you elevate WINWORD.EXE.

I could tell that it was likely a security permission issue that was causing this fault, however I did evidence my findings by using Sysinternals Process Monitor which confirmed that the WINWORD.EXE process was unable to open the CAG file for amendment.

Web Badges from the 1990s and 2000s

One of the aesthetics of old web pages that I love the most are those teeny tiny badges (sometimes animated) that appear towards the bottom of the pages. Back in the days of 640×480 or 800×600 resolution CRT monitors these badges weren’t instantly visible until you reached the end of the badge. However these days, if you manage to stumble onto a relic of a webpage, the badges usually show up in full view thanks to 1080p monitor resolutions.

These little badges managed to perform a variety of simple tasks from advertising products you personally endorsed (like web browsers or chat applications), to forced sponsorship badges from your hosting provider, to badges indicating that your website (or webpage) used only the latest of web technology.

This post is a celebration of these tiny heroes, forgotten to time and dreadfully out of fashion.

Enjoy!

If you prefer web banners, then check out this post.

Warning!
This page probably will make whatever browser you are using run slow – to the point it might even stop responding.

Gallery

Web Banners from the 1990s and 2000s

In similar vein to the Web Badges post, this post will feature a gallery of those pesky ad banners, which in hindsight were probably less infuriating than some of the modern multimedia type adverts we have to endure today!

Bask in the glory of 4 frame gifs with plenty of dither!

Disclaimer

This page is a true assault on the eyes – so if you become hypnotised from watching all of these banners blink away simply close your browser window!

In all seriousness this page may take a while to load depending on how it grows, although most of these banners came from an era of dial up moden and slow DSL broadband and weigh in a measly ~20KB you may find they take a while to load in.

Also if you are using a browser based ad-blocker such as AdBlockPlus or uBlock Origin then you may find that some of the banners do not load / display. Simply temporarily disable the plug in and everything should show in all its glory (its ok you can turn the blocker back on after!).

All the dates given in parentheses “()” are from the date modified string on the original file – they may not be strictly accurate to the age of the banner.

Gallery

Software Splash Screen Gallery

A post that is a tribute to those few moments (or sometimes gruelling minutes on slow systems!) where you are greeted by a nice high-colour picture introducing the software you are about to run or install – often with fancy effects that add unobtainable levels of awesome within the actual software.

Terrible 90s Web Graphics (Art Explosion!)

While sorting through a cupboard of old unused software at work we came across a nearly complete collection of clip-art, fonts, photos and graphics simply titled Art Explosion.

The discs contain your normal fare of odd clip-art (which appear to mostly be scans of drawings from 1900-1950), low-resolution amateur photographs of various subjects (a post on these to come), fonts that I don’t think anyone would ever consider using and a small amount of totally radical gnarly web graphics – just what you need to make your GeoCities website really POP. Anyway, enough rambling…

Warning!
This page probably will make whatever browser you are using run slow – to the point it might even stop responding.

Animations

Let’s not mess around here – the best items on these CD-ROM’s are the animated GIF’s.

Buttons

Yeah these aren’t that interesting. There are hundreds of variants on the CD-ROM, so I will only share my er… favourites.

Offset Oval on White

Oval Chrome Red Dark Background

Oval Gel Blue Light Background

Paint Splat Bubble Gum Light Background

Panic Button Bubbled Purple

Santa Fe Plaque Green

Scribble Lava Light Background